How To Grow Potatoes
Growing Potatoes: A Gardener’s Delight
If there’s one thing that brings joy to a gardener’s heart, it’s the satisfaction of digging into the soil and unearthing fresh, homegrown potatoes. There’s something truly magical about planting these humble tubers and watching them transform into a hearty, delicious harvest. Potatoes are not only versatile in the kitchen but also incredibly rewarding to grow. Let me share my tried-and-true methods for cultivating a bountiful potato crop, straight from my own gardening experience.
Choosing the Right Variety
Potatoes come in so many wonderful varieties, each offering unique flavours and textures. Whether you prefer the creamy versatility of Sebago, the firm and waxy Kipfler for salads, or the rich, pink-skinned Desiree for roasting, there’s a potato for every taste and recipe. When choosing your variety, think about how you’ll use your harvest. Love a good mash? Sebago is perfect. Need a potato that holds its shape for soups? Kipfler won’t disappoint. Take the time to explore local options—you might even find some heirloom varieties to try.
When to Plant
Timing matters when it comes to planting potatoes. In cooler regions, aim to plant in early spring, a few weeks before the last frost. For warmer areas, like much of Queensland, you can plant year-round, although cooler months yield the best results. I’ve found that late winter to early spring works perfectly in my garden, giving the plants enough time to establish before the summer heat kicks in.
Preparing the Soil
Potatoes are heavy feeders, so they thrive in nutrient-rich, loose soil. Before planting, I like to mix in plenty of organic compost and a good helping of aged manure to enrich the soil. Adding a bit of potash or blood and bone ensures the plants have all the nutrients they need to grow strong and healthy. If your soil is on the clay side, consider raised beds or mounding the soil to improve drainage. Potatoes don’t like sitting in waterlogged soil—they need room to breathe and grow.
Planting Your Potatoes
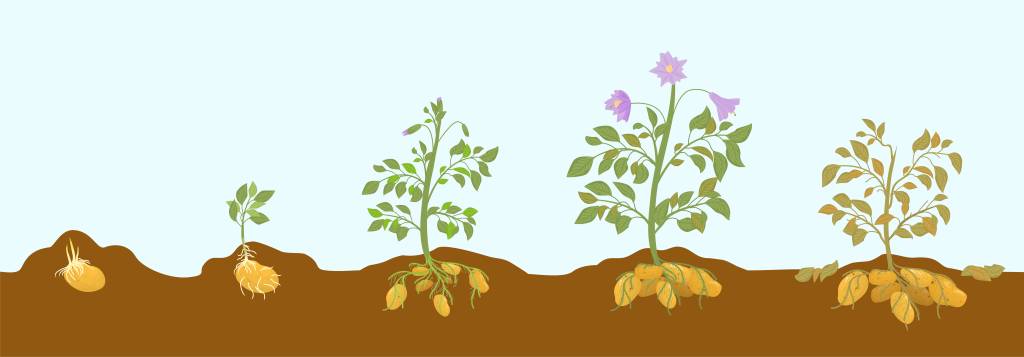
Start with certified seed potatoes to avoid disease. If your seed potatoes are large, cut them into smaller pieces, making sure each piece has at least two “eyes” (the little sprouts). Allow these pieces to cure for a couple of days in a warm, dry spot—this step helps prevent rot when they’re planted.
When you’re ready to plant, dig holes or a trench about 10 cm deep and place the potato pieces with the eyes facing up. Space them about 30 cm apart, with rows at least 80 cm apart. Cover with soil, water them in, and you’re off to a great start.
Caring for Your Potato Plants
As your potato plants grow, they’ll need a bit of extra care. Once the plants reach about 20 cm in height, it’s time to start mounding soil or mulch around their base. This process, called hilling, encourages the plants to produce more tubers while keeping sunlight away from the growing potatoes. (Sunlight can turn potatoes green and inedible.) Repeat the hilling process every couple of weeks as the plants grow taller.
Consistent watering is key. Potatoes like even moisture, but too much water can lead to rot or diseases. A good mulch layer helps retain moisture and keeps the soil temperature steady.
Dealing with Pests and Diseases
Potatoes can sometimes attract pests like aphids or potato beetles, but a little planning goes a long way in preventing issues. Companion planting is one of my favourite strategies—I like to grow marigolds nearby to deter pests naturally. Crop rotation is another essential practice. Avoid planting potatoes (or other nightshade family crops like tomatoes) in the same spot two years in a row to reduce the risk of soil-borne diseases like blight.
If pests do show up, keep it simple. Hand-picking beetles and using natural sprays made from garlic or neem oil can help keep your plants healthy.
Growing Potatoes in Small Spaces
Don’t let limited space stop you from enjoying homegrown potatoes. They thrive in containers, bags, or even chicken wire towers. I’ve had great success growing potatoes in large pots. Start by filling the bottom with a layer of rich compost, plant your seed potatoes, and keep adding soil or straw as the plants grow. It’s fun to watch the greenery spill over the edges, and harvesting is as simple as tipping the pot over!
Harvesting Your Potatoes
Harvesting is the best part of growing potatoes. Once the plants flower and the foliage starts to yellow and die back, your potatoes are ready. For “new” potatoes, gently dig around the plants a couple of weeks after flowering. If you’re after fully mature spuds, wait until the foliage has completely died off. Use a garden fork to carefully lift the potatoes from the soil, taking care not to pierce them.
After harvesting, let the potatoes sit in a shaded spot for a few hours to dry. This toughens their skins and prepares them for storage. For long-term storage, keep them in a cool, dark, and well-ventilated place. Paper bags work well for this purpose, as they allow the potatoes to breathe.
Troubleshooting Common Issues
Generally speaking, even the best-laid plans can run into hiccups. Here are a few common problems and how to handle them:
- Green Potatoes: Cover exposed potatoes with soil or mulch to prevent greening.
- Cracked Tubers: Ensure consistent watering, especially during tuber formation.
- Blight: Rotate your crops and avoid overcrowding to reduce fungal diseases.
Why Grow Your Own Potatoes?
There’s something so satisfying about growing your own potatoes. The simple act of planting and nurturing these versatile vegetables connects you to the soil and gives you a sense of accomplishment when you unearth your fresh spuds. Nothing beats the taste of homegrown potatoes—rich, earthy, and full of flavour. In brief, once you experience it, store-bought potatoes just don’t compare. Grab your gloves, choose a variety you love, and enjoy the magic of gardening.

The Quick Read Section – The Secrets To A Massive Harvest
Secrets to a Massive Potato Harvest
Generally speaking, a thriving potato crop takes more than planting and watering. These tips will help you maximize your yield:
Smart Harvesting
Start harvesting new potatoes a couple of weeks after the plants flower. For mature tubers, wait until the foliage has fully died back. Leave them in the soil for a week before harvesting to let their skins toughen.
Cure Seed Potatoes
Cut seed potatoes into smaller pieces with two or three eyes each, and let them dry for a few days. This protective step reduces the chance of rot when planted.
Hill Up Regularly
As the plants grow, add soil or mulch around the stems to cover the tubers. This prevents sunlight from turning them green and boosts tuber production.
Soil Preparation
Potatoes love loose, well-draining soil that’s rich in nutrients. Mix in compost or aged manure to create the perfect environment for their growth.
Companion Plants
Plant marigolds nearby to keep pests away and beans to naturally enrich the soil with nitrogen. This creates a healthier growing space for your potatoes.
Balanced Fertilizing
Avoid excessive nitrogen, as it promotes leafy growth at the expense of tubers. Use fertilizers rich in phosphorus to encourage strong root development and larger yields.
Rotate Your Crops
Never grow potatoes in the same spot year after year. Rotating your crops prevents diseases and keeps the soil healthy.
Consistent Moisture
Potatoes need steady moisture to grow well, especially as the tubers form. Avoid overwatering, which can lead to rot, and use mulch to help retain moisture.
Common Growing Potato Questions?
1. How do you grow potatoes from fresh potatoes? Use certified seed potatoes for the best results. Cut them into pieces with two or three eyes each, let them dry for a couple of days, and plant them in loose, nutrient-rich soil.
2. How do you grow potatoes in Australia? In Australia, plant potatoes in late winter or early spring. Use well-draining soil, water consistently, and mound soil around the stems as the plants grow. Harvest when the foliage dies back.
3. What is the best month to plant potatoes? The best planting time depends on your region. In cooler climates, plant from late winter to early spring. In frost-free areas, you can plant nearly year-round, but cooler months yield better results.
All in all, Happy growing guys!
Find more Growing tips on Seeds Australia
Follow us on Instagram – Seeds_australia


